Unit Testing report with GitHub actions

If you are working on application development project, you must have unit test written for the code of your application, Unit testing is an important step in the development process, because if done correctly, it can help detect early flaws in code which may be more difficult to find in later testing stages.
In this blog I will share how to generate Unit test result with GitHub workflow actions.
Prerequisites
GitHub Actions is built in service provided with your GitHub account, so you need a GitHub repository where you will add your project with unit test and we will use Test Reporter action which we will use to generate the test repo result.
Test Reporter action
This GitHub action supports unit test result report for the following language / frameworks:
For more information see Supported formats section.
Do you miss support for your favorite language or framework? Please create Issue or contribute with PR.
Unit Testing with Dot .Net Core
Here for the demonstration I have sample Dotnet core Library project a simple calculator project (written in dotnet core 6.0)

Next we have nunit test core project for testing our calculator project
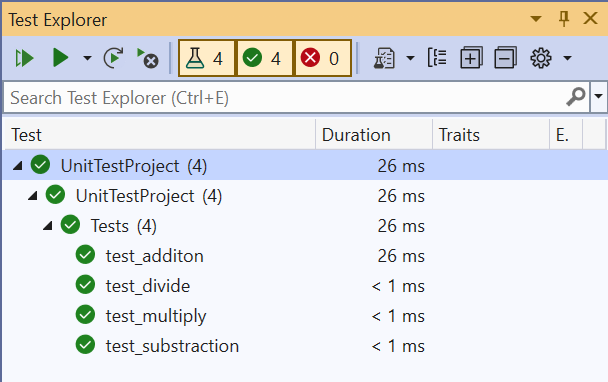
This test project can be tested locally like this
GitHub Action CICD
Now we can automate the build and deployment of our calculator application with GitHub action workflow
and GitHub Action for dotnet build can test be this
Above code will have following result
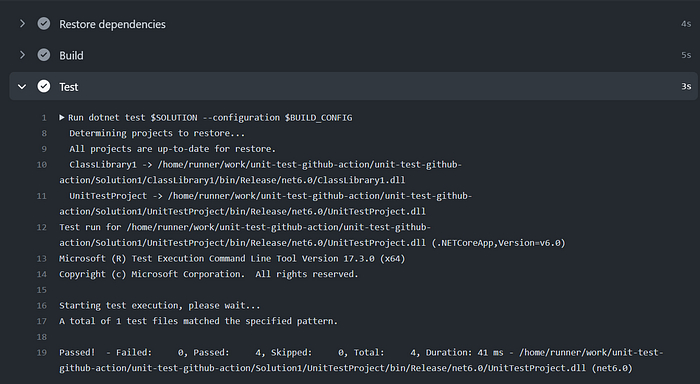
As you can see the result GitHub action generates the test result in command line but it does not generates the report
Now let’s use the Test Reporter GitHub action
To use this in our dotnet project will be
name: 'CI'
on:
  pull_request:
jobs:
  build-test:
    runs-on: ubuntu-latest
    steps:
      - uses: actions/checkout@v2         # checkout the repo
      - run: npm ci                       # install packages
      - run: npm test                     # run tests (configured to use jest-junit reporter)
      - uses: actions/upload-artifact@v2  # upload test results
        if: success() || failure()        # run this step even if previous step failed
        with:
          name: test-results
          path: jest-junit.xml
With dotnet test command
dotnet test --logger "trx;LogFileName=test-results.trx"Or you can configure TRX test output in *.csproj or Directory.Build.props:
<PropertyGroup>
  <VSTestLogger>trx%3bLogFileName=$(MSBuildProjectName).trx</VSTestLogger>
  <VSTestResultsDirectory>$(MSBuildThisFileDirectory)/TestResults/$(TargetFramework)</VSTestResultsDirectory>
</PropertyGroup>
Here is the example of our sample pipeline
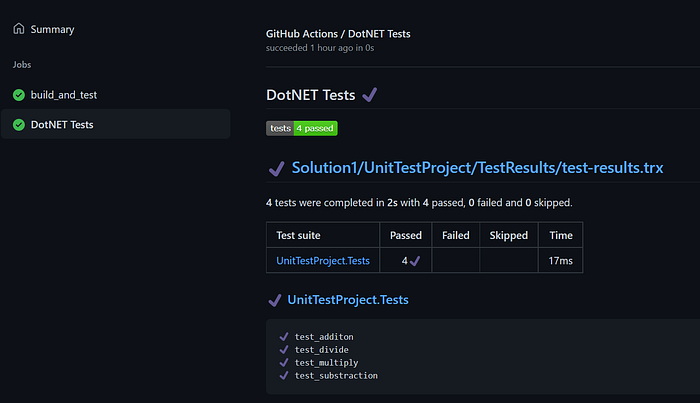
Now if we run the pipeline it will show the changes as we expect
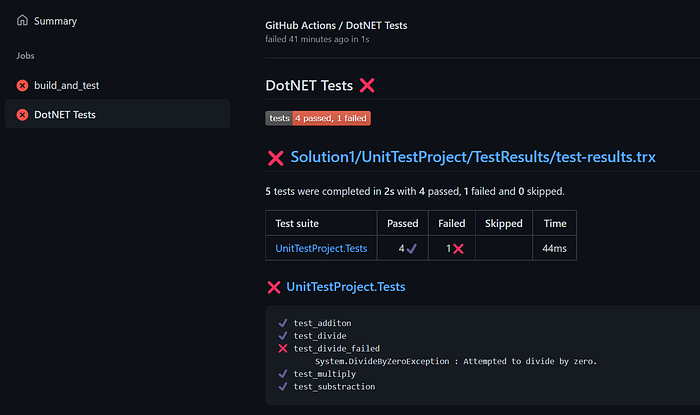
Now let’s look at the Unit testing result in case if the test cases are failed
I hope you have found this useful, the same blog explanation you can find here on my YouTube channel
Please do subscribe to my channel, I have a lot more videos on Azure, GitHub, Terraform and others.
Reference
You can find the code repository here:
https://github.com/krishrocks1904/unit-test-github-action
Link to the GitHub action used in the demonstration can be found here:
https://github.com/marketplace/actions/test-reporter
Cheers!! 🍺🍻🍺